Student Approval Recheck Edits: Difference between revisions
Jump to navigation
Jump to search
content |
No edit summary |
||
| (6 intermediate revisions by 2 users not shown) | |||
| Line 1: | Line 1: | ||
<center><small>(Navigate to [[Case Load Import|< Case Import]] | <b>[[I-Star Student User Guide]]</b> | [[Indicator 11|Indicator 11 >]])</small></center> | |||
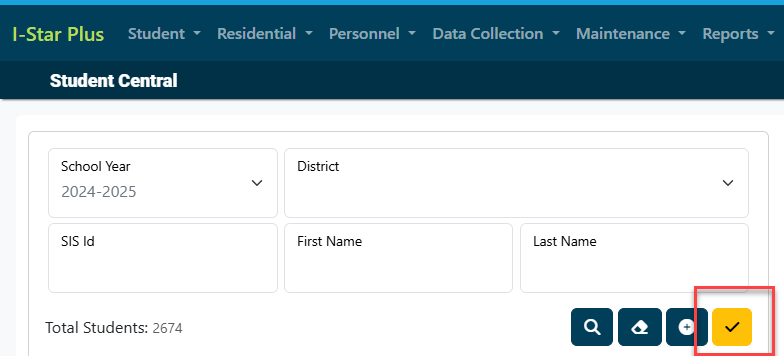
To check for errors in your student approval records, click the yellow checkmark in Student Central to begin the process. | |||
[[File:Recheckedits process.png|none|thumb|687x687px]] | |||
[[File: | NOTE: You will receive an email once the status of the error check is complete. Once you receive the email confirmation (shown below) you can then run an error report. | ||
[[File:Email for a recheck edits.png|none|thumb|646x646px]] | |||
To run the ''Student Approval Error Report'', click on the '''Reports''' tab and click '''Reports.''' | |||
[[File:Reports tab and then reports.png|none|thumb|747x747px]] | |||
Select '''Student''' for the ''Report Type'', select '''Errors''' for ''Report Categories'' and click ''the blue magnifying glass to run the report.'' | |||
[[File:Student error report.png|none|thumb|1423x1423px]] | |||
[[File: | |||
Click the print icon next to the type of error report that is needed. | |||
[[File:Selecting an error report.png|none|thumb|1478x1478px]] | |||
Select the applicable report filters. Once selected, click 'view report'. | |||
[[File:Select the report filters before printing.png|none|thumb|1080x1080px]] | |||
For a more in-depth look at various file types, click [[Student Reports|HERE]]. | |||
<center><small>(Navigate to [[Case Load Import|< Case Import]] | <b>[[I-Star Student User Guide]]</b> | [[Indicator 11|Indicator 11 >]])</small></center> | |||
Latest revision as of 08:49, 18 March 2025
To check for errors in your student approval records, click the yellow checkmark in Student Central to begin the process.

NOTE: You will receive an email once the status of the error check is complete. Once you receive the email confirmation (shown below) you can then run an error report.

To run the Student Approval Error Report, click on the Reports tab and click Reports.

Select Student for the Report Type, select Errors for Report Categories and click the blue magnifying glass to run the report.

Click the print icon next to the type of error report that is needed.

Select the applicable report filters. Once selected, click 'view report'.

For a more in-depth look at various file types, click HERE.