Events: Difference between revisions
Jump to navigation
Jump to search
mNo edit summary |
No edit summary |
||
| Line 1: | Line 1: | ||
<center><small>(Navigate to [[Notes|< Notes]] | <b>[[I-Star Student User Guide]]</b> | [[Transportation|Transportation >]])</small></center> | <center><small>(Navigate to [[Notes|< Notes]] | <b>[[I-Star Student User Guide]]</b> | [[Transportation|Transportation >]])</small></center> | ||
To add/edit events, search for the student approval that required edits and scroll to the bottom to view the “Notes / Events” section. Click the + sign to add a new event. | |||
[[File:Notesandevents.png|none|thumb|975x975px]] | |||
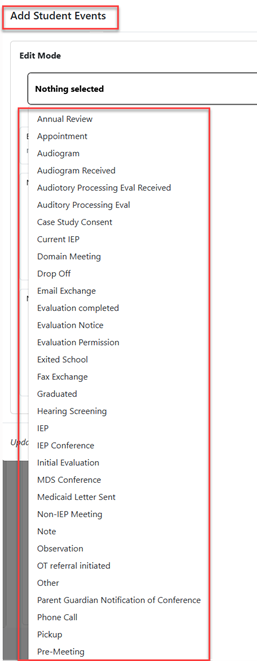
Choose an event type from the first dropdown. | |||
[[File: | [[File:Eventtype.png|none|thumb]] | ||
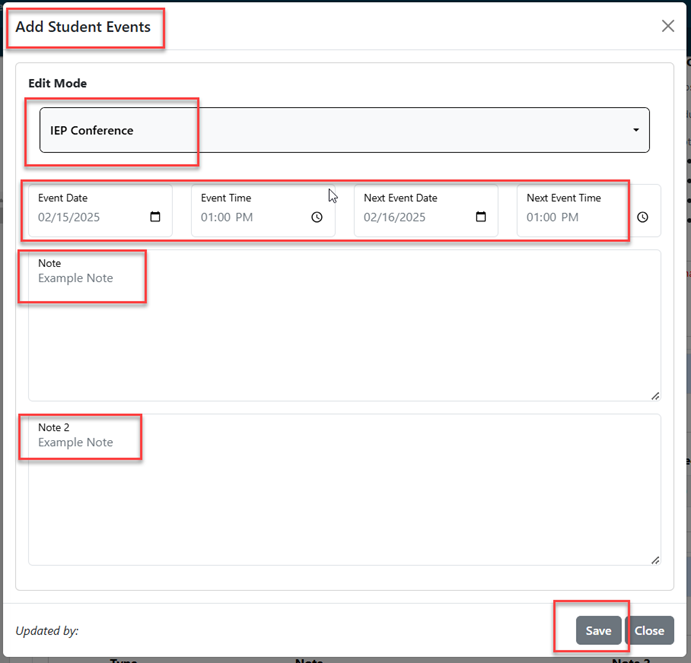
After choosing the note(s) that apply, two text boxes are available as well as event dates and event time dropdowns. Fill out the sections appropriately (if needed) and click save to complete. | |||
[[File:Notesthatapply.png|none|thumb|691x691px]] | |||
After saving, the event will be displayed on the Student Approval View. | |||
[[File:Addednewevent.png|none|thumb|975x975px]] | |||
To edit an event, click the edit icon. | |||
[[File:Editexistingnote.png|none|thumb|975x975px]] | |||
[[File: | |||
Revision as of 14:31, 29 January 2025
To add/edit events, search for the student approval that required edits and scroll to the bottom to view the “Notes / Events” section. Click the + sign to add a new event.

Choose an event type from the first dropdown.

After choosing the note(s) that apply, two text boxes are available as well as event dates and event time dropdowns. Fill out the sections appropriately (if needed) and click save to complete.

After saving, the event will be displayed on the Student Approval View.

To edit an event, click the edit icon.
