Adding Reimbursement Record: Difference between revisions
No edit summary |
No edit summary |
||
| (6 intermediate revisions by the same user not shown) | |||
| Line 2: | Line 2: | ||
Once an approval record is saved for a student, an accompanying claim record will be created in Claims Analytics. | |||
To access the claim section in I-Star Plus, click on the '''Student''' dropdown and select '''Claims Analytics'''. | |||
[[File: | [[File:Claim analytics.png|none|thumb|412x412px]] | ||
To review all existing claim records, click the blue magnifying glass and all records will populate. | |||
[[File:All claim records.png|none|thumb|1489x1489px]] | |||
Enter the applicable information for this claim record. | |||
To search for a specific fund code, select an option from the Payment Type dropdown and click the blue magnifying glass. | |||
EC Excess Cost -- Fund X | |||
OR Orphanage -- Funds D, E and/or F (Regular Term) | |||
PF Private Tuition -- Fund B | |||
RC Residential Claims -- Fund B | |||
SO Summer Orphanage -- Funds D, E and/or F (Summer Term) | |||
[[File:Payment type dropdown selection.png|none|thumb|1683x1683px]] | |||
After entering in the needed search filters, click one of the three icons under the details column: | |||
[[File:Details column for student claims.png|none|thumb|594x594px]] | |||
Graduation Hat Icon: View Student Approval Summary | |||
[[File:Student approval summary.png|none|thumb|1458x1458px]] | |||
Dollar Sign Icon: View Student Claim Summary | |||
[[File:Dollar sign icon.png|none|thumb|1469x1469px]] | |||
Arrow Icon: View Claim Details in New Tab | |||
Clicking this icon will open a new browser window that populates Student Central. | |||
[[File:Arrow icon for claim details.png|none|thumb|592x592px]] | |||
[[File:Student central for claims.png|none|thumb|1596x1596px]] | |||
To enter student claim data, locate the Claims panel and click on the edit button. | |||
[[File:Enter in student claim data.png|none|thumb|844x844px]] | |||
Enter the applicable information for this claim record. Refer to the scenarios listed below to help choose the method of computing days. | |||
[[File:Method of computing days.png|none|thumb|888x888px]] | |||
| Line 32: | Line 71: | ||
'''4. Do you have any | '''4. Do you have any Fund Code E students, Fund Code X students? Do you have any bills to create for student that your district or coop serves from another district?''' | ||
YES = You can create a program using the Program Method in I-Star to be used as a tool to calculate the student costs. However, please remember the program method is an optional tool in I-Star. Using the program method of computing days is NOT required. | YES = You can create a program using the Program Method in I-Star plus to be used as a tool to calculate the student costs. However, please remember the program method is an optional tool in I-Star plus. Using the program method of computing days is NOT required. | ||
You can | You can check for errors on this particular claim record by clicking the yellow '''Check Errors''' button at the bottom of the claim record. | ||
[[File: | [[File:Save and check claim errors.png|none|thumb|820x820px]] | ||
NOTE: If the student's approval record is disapproved, the student's claim record will automatically flag as disapproved. | |||
When completed, select Cancel to return to Student Central. | |||
<center><small>(Navigate to [[I-Star Student Reimbursement|< I-Star Student Reimbursement]] | <b>[[I-Star Student User Guide]]</b> | [[Student Claim Recheck Edits|Student Claim Recheck Edits >]])</small></center> | <center><small>(Navigate to [[I-Star Student Reimbursement|< I-Star Student Reimbursement]] | <b>[[I-Star Student User Guide]]</b> | [[Student Claim Recheck Edits|Student Claim Recheck Edits >]])</small></center> | ||
Latest revision as of 10:25, 18 March 2025
Once an approval record is saved for a student, an accompanying claim record will be created in Claims Analytics.
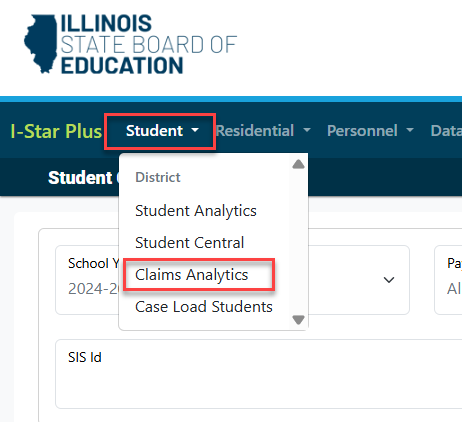
To access the claim section in I-Star Plus, click on the Student dropdown and select Claims Analytics.
To review all existing claim records, click the blue magnifying glass and all records will populate.

To search for a specific fund code, select an option from the Payment Type dropdown and click the blue magnifying glass.
EC Excess Cost -- Fund X
OR Orphanage -- Funds D, E and/or F (Regular Term)
PF Private Tuition -- Fund B
RC Residential Claims -- Fund B
SO Summer Orphanage -- Funds D, E and/or F (Summer Term)

After entering in the needed search filters, click one of the three icons under the details column:

Graduation Hat Icon: View Student Approval Summary

Dollar Sign Icon: View Student Claim Summary

Arrow Icon: View Claim Details in New Tab
Clicking this icon will open a new browser window that populates Student Central.

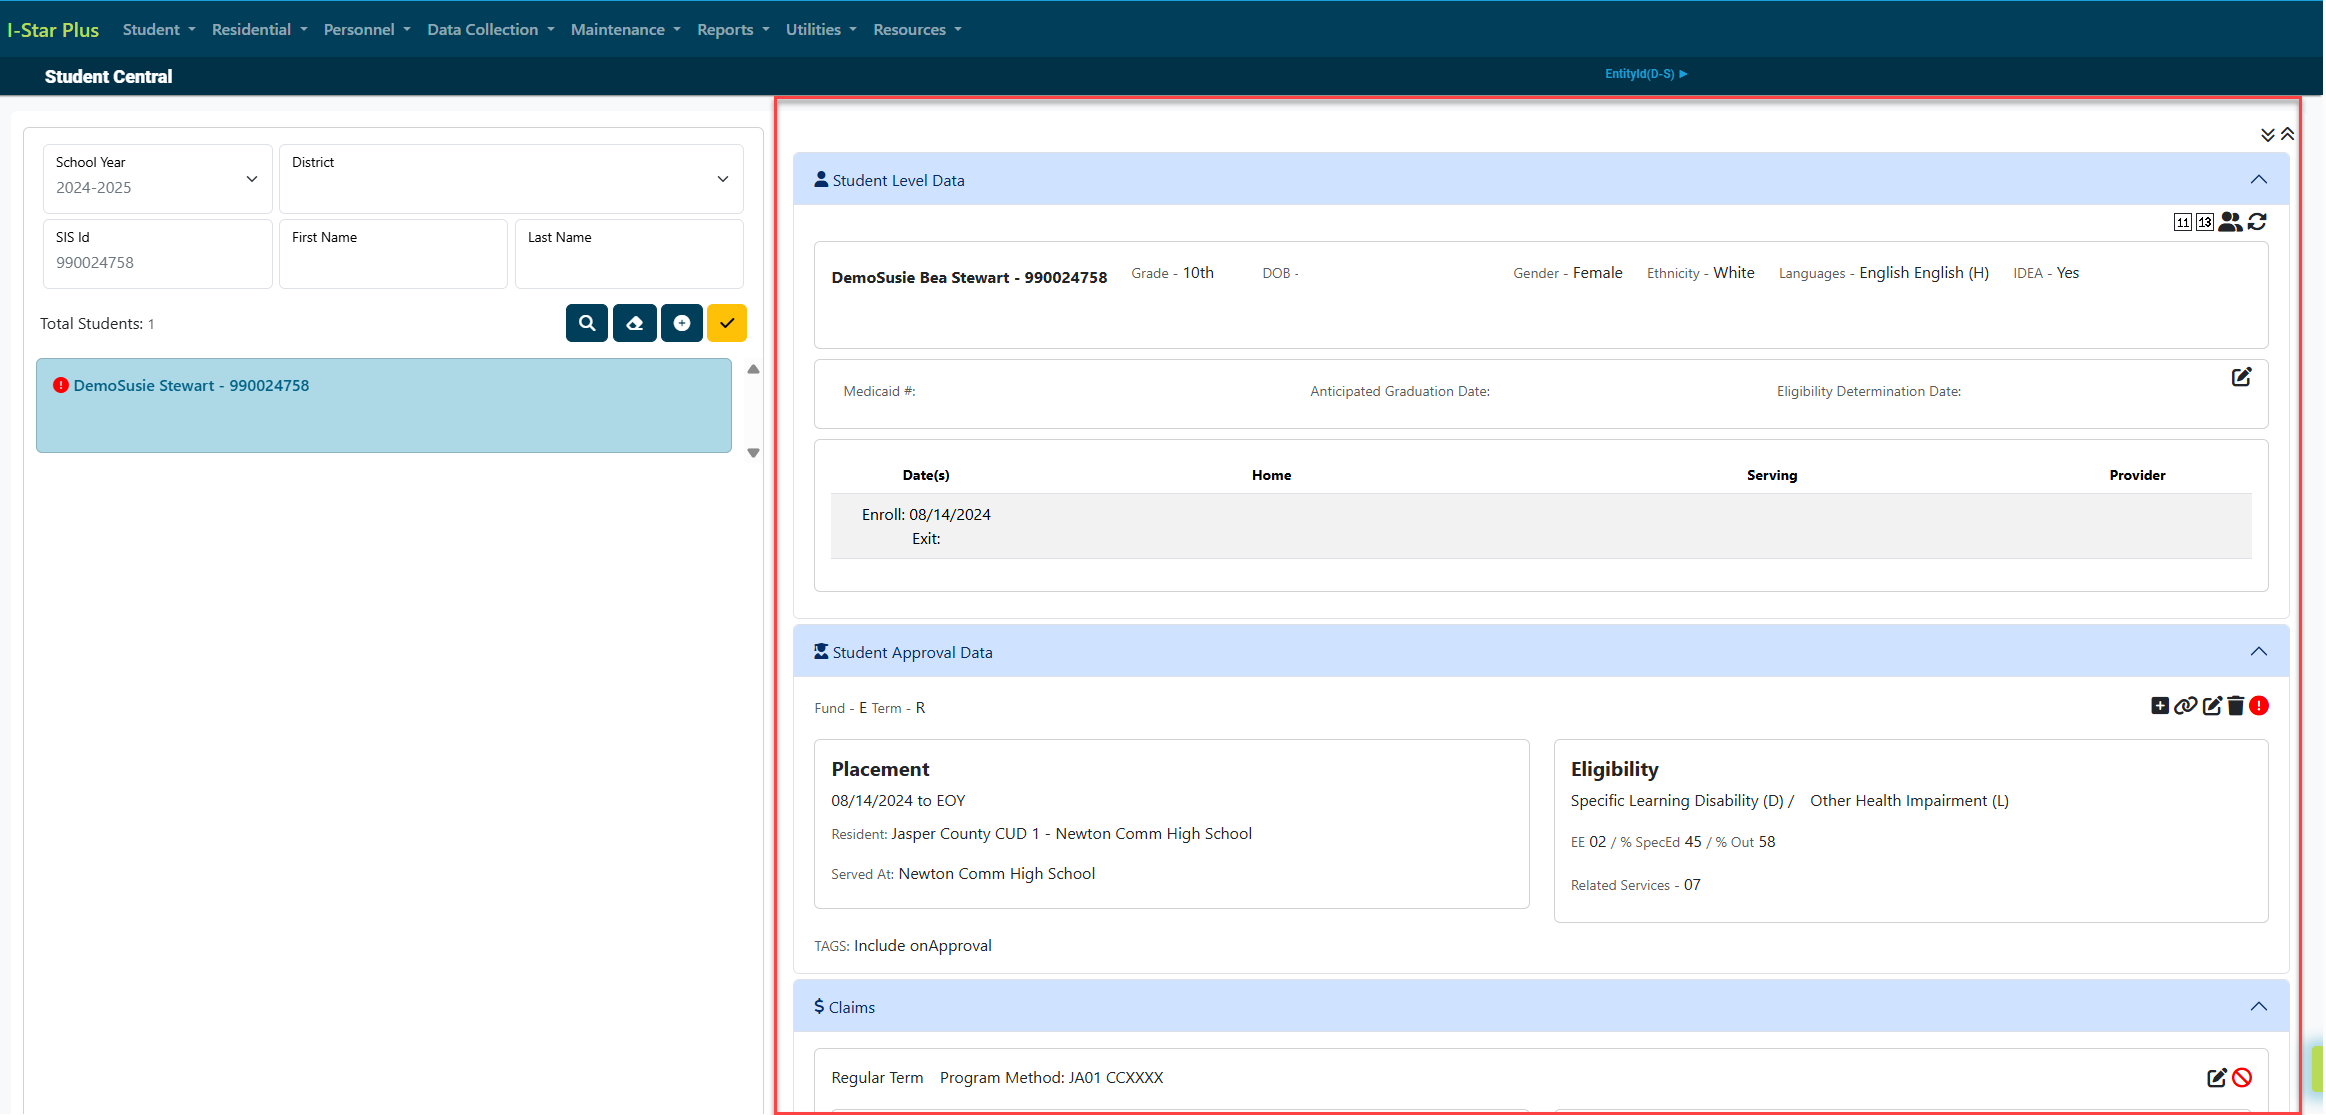
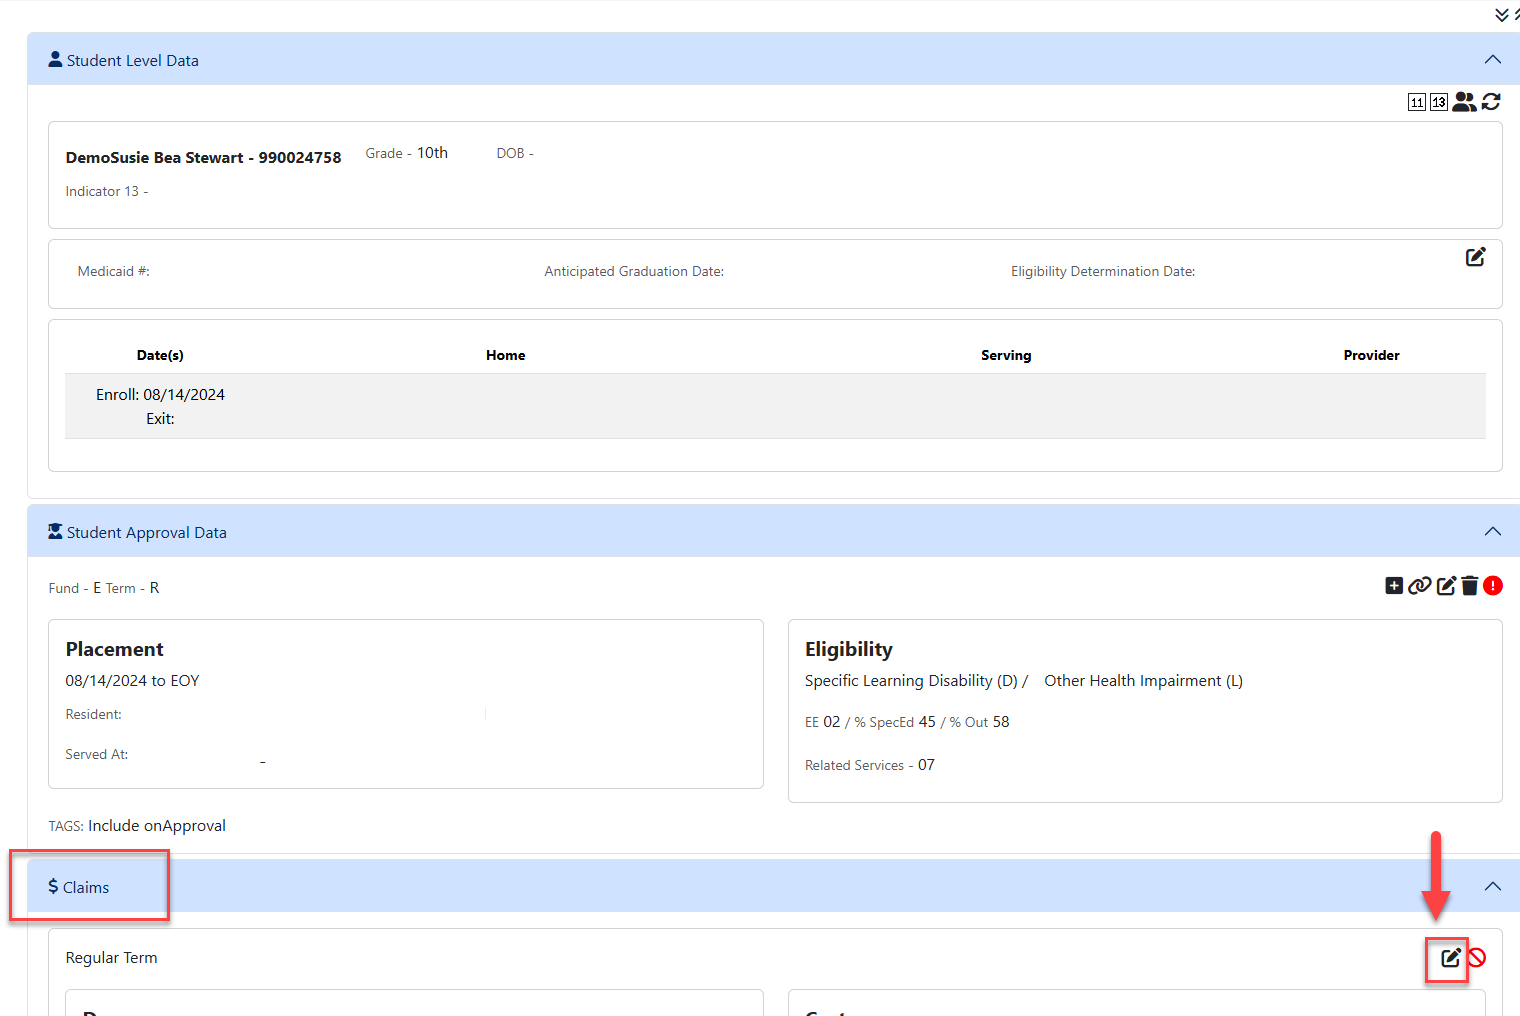
To enter student claim data, locate the Claims panel and click on the edit button.
Enter the applicable information for this claim record. Refer to the scenarios listed below to help choose the method of computing days.
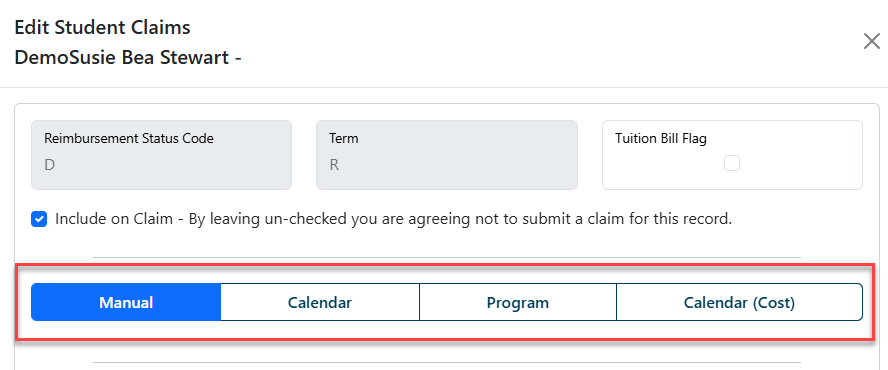
NOTE: Ask yourself these questions to determine which Method of Computing Days you should choose:
1. Are you receiving a bill from another public district?
YES = Calendar Method or Manual Method
2. Are you receiving a bill from a special ed cooperative that has an official calendar?
YES = Calendar Method
NO = Manual Method
3. Are you receiving a bill from a private facility?
YES = Manual Method
4. Do you have any Fund Code E students, Fund Code X students? Do you have any bills to create for student that your district or coop serves from another district?
YES = You can create a program using the Program Method in I-Star plus to be used as a tool to calculate the student costs. However, please remember the program method is an optional tool in I-Star plus. Using the program method of computing days is NOT required.
You can check for errors on this particular claim record by clicking the yellow Check Errors button at the bottom of the claim record.
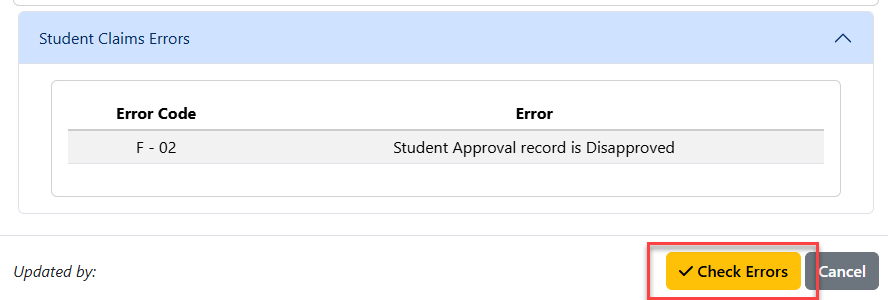
NOTE: If the student's approval record is disapproved, the student's claim record will automatically flag as disapproved.
When completed, select Cancel to return to Student Central.