Assign Security Roles: Difference between revisions
No edit summary |
mNo edit summary |
||
| Line 25: | Line 25: | ||
[[File:Manage Security.png|alt=Manage Security|none|thumb|528x528px|Manage Security]] | [[File:Manage Security.png|alt=Manage Security|none|thumb|528x528px|Manage Security]] | ||
'''Step 3:''' Search by ''IWAS User ID, RCDT,'' or ''Last Name/First Name'': | '''Step 3:''' Search by ''IWAS User ID, RCDT,'' or ''Last Name/First Name'': | ||
[[File:User Search.png|alt=User Search|none|thumb|1006x1006px|User Search]] | [[File:User Search.png|alt=User Search|none|thumb|1006x1006px|User Search]] | ||
'''Step 4:''' Select the ''IWAS User Id'' name to view/edit user roles. | '''Step 4:''' Select the ''IWAS User Id'' name to view/edit user roles. | ||
[[File:Select Iwas Userid.png|alt=Select Iwas Userid|none|thumb|996x996px|Select Iwas Userid]] | [[File:Select Iwas Userid.png|alt=Select Iwas Userid|none|thumb|996x996px|Select Iwas Userid]] | ||
'''Step 5:''' Click '''Modify''' to edit and/or assign user roles. | '''Step 5:''' Click '''Modify''' to edit and/or assign user roles. | ||
[[File:Modify Assigned System Roles.png|alt=Modify Assigned System Roles|none|thumb|306x306px|Modify Assigned System Roles]] | [[File:Modify Assigned System Roles.png|alt=Modify Assigned System Roles|none|thumb|306x306px|Modify Assigned System Roles]] | ||
'''Step 6:''' Select the type of role that you would like this user to have by clicking the appropriate button in the ''Current Access'' column. | '''Step 6:''' Select the type of role that you would like this user to have by clicking the appropriate button in the ''Current Access'' column. | ||
Latest revision as of 09:38, 30 August 2022
This layer of security allows a district or coop administrator to assign specific roles to I-Star users.
Once all of your I-Star users have established IWAS accounts and logged into I-Star at least once, the district or cooperative administrator can assign security roles to all the users on their behalf.
To assign specific roles to I-Star users follow the steps below:
Step 1: To assign security roles from the Admin drop-down menu, click User List.

NOTE: To request a security role, see I-Star User Roles.
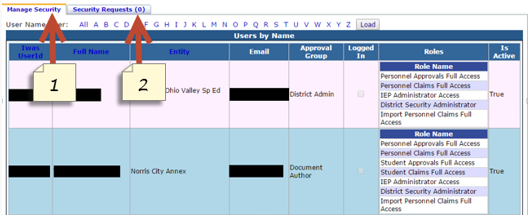
Step 2: Click the Manage Security tab.
NOTE: The User List will have two tabs:
- Manage Security
- This tab will show all users assigned to your district(s).
- Security Request
- This tab shows any users who have requested a user role. See Approve/Deny a Security Request.
- If a district or coop administrator has not assigned a security role to a user, see I-Star User Roles/Requests.

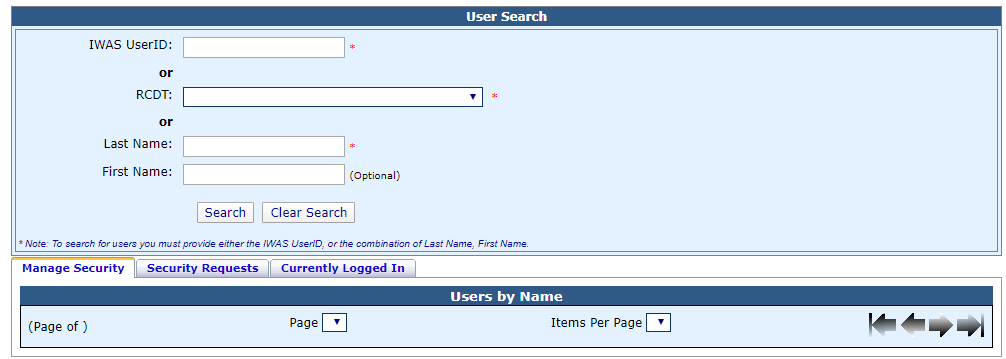
Step 3: Search by IWAS User ID, RCDT, or Last Name/First Name:

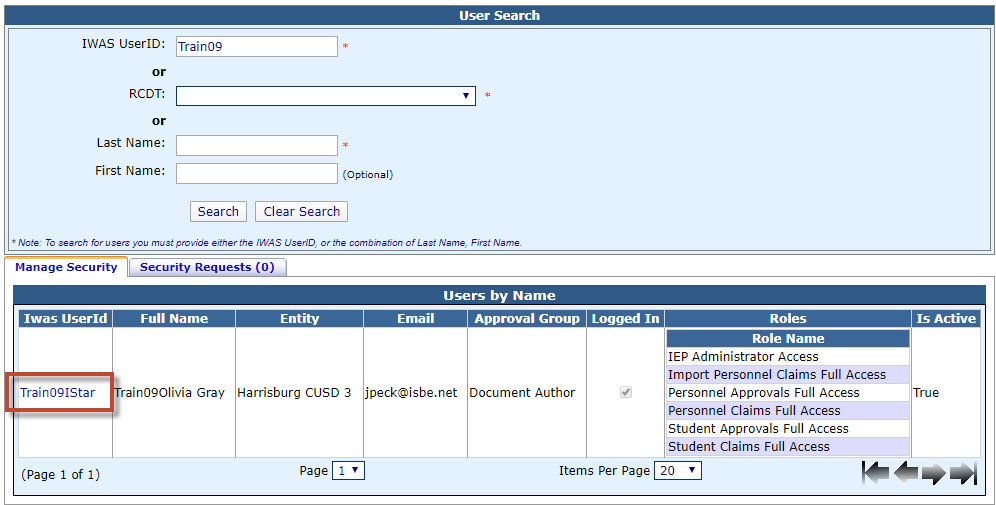
Step 4: Select the IWAS User Id name to view/edit user roles.

Step 5: Click Modify to edit and/or assign user roles.

Step 6: Select the type of role that you would like this user to have by clicking the appropriate button in the Current Access column.

Step 7: District superintendents and/or cooperative directors are the only IWAS users that can manage security in the IWAS system. Since this may be a time-consuming task, they may delegate this responsibility to another user or users in their district or cooperative for I-Star. Select the button under the current access column under the District Security Administrator box.

Step 8: Click the Save radio button and then click Save.
