Transportation: Difference between revisions
No edit summary |
mNo edit summary |
||
| (5 intermediate revisions by 2 users not shown) | |||
| Line 1: | Line 1: | ||
<center><small>(Navigate to [[Events|< | <center><small>(Navigate to [[Events|< Events]] | <b>[[I-Star Student User Guide]]</b> | [[Youth in Care Tab|Youth in Care Tab >]])</small></center> | ||
'''Step 1:''' Click the '''Transportation''' button to enter to the student's special transportation information. | '''Step 1:''' Click the '''Approvals and Claims''' tab and select '''Student''' & '''Approvals'''. | ||
[[File:Trans12.png|none|thumb|437x437px]] | |||
'''Step 2:''' Click the '''Student Profile''' icon. | |||
[[File:Profiletab.png|none|thumb|178x178px]] | |||
'''Step 3:''' Click the '''Transportation''' button to enter to the student's special transportation information. | |||
[[File:Trans.png|none|thumb|437x437px]] | [[File:Trans.png|none|thumb|437x437px]] | ||
'''Step | '''Step 4:''' Click '''Add''' next to the section you where wish to add a new record. | ||
[[File:Trans1.png|none|thumb|902x902px]] | [[File:Trans1.png|none|thumb|902x902px]] | ||
| Line 14: | Line 22: | ||
'''Transportation Schedule''' | '''Transportation Schedule''' | ||
'''Step | '''Step 5:''' Enter the appropriate information and click '''Save'''. | ||
[[File:Trans2.png|none|thumb|510x510px]] | [[File:Trans2.png|none|thumb|510x510px]] | ||
| Line 26: | Line 34: | ||
'''Special Needs''' | '''Special Needs''' | ||
'''Step | '''Step 6:''' Choose the special need from the drop-down and click '''Save'''. | ||
NOTE: ''Special Needs'' in this drop-down are populated from the ''Special Needs Definition'' that required an initial set up. Click '''here''' for instructions to add a ''Special Needs Definition''. | NOTE: ''Special Needs'' in this drop-down are populated from the ''Special Needs Definition'' that required an initial set up. Click '''here''' for instructions to add a ''Special Needs Definition''. | ||
| Line 33: | Line 41: | ||
'''Step | '''Step 7:''' To edit a special needs record, simply click the pencil icon. To ''delete'', click the red '''X'''. | ||
[[File:Trans5.png|none|thumb|846x846px]] | [[File:Trans5.png|none|thumb|846x846px]] | ||
| Line 40: | Line 48: | ||
'''Billing History''' | '''Billing History''' | ||
'''Step | '''Step 8:''' Enter the appropriate information and click '''Save'''. | ||
[[File:Trans6.png|none|thumb|846x846px]] | [[File:Trans6.png|none|thumb|846x846px]] | ||
'''Step | '''Step 9:''' To edit a billing history record, simply click the pencil icon. To delete, click the red '''X.''' | ||
[[File:Trans7.png|none|thumb|847x847px]] | [[File:Trans7.png|none|thumb|847x847px]] | ||
'''Step | '''Step 10:''' Click '''Return''' to go back to the student's profile. | ||
[[File:Return button.png|none|thumb]] | [[File:Return button.png|none|thumb]] | ||
'''Step 11:''' Click '''Back To Student Approvals''' to go back to the '''Student Approval Searc'''h page. | |||
[[File:Returntostudentapproval.png|none|thumb|360x360px]] | |||
<center><small>(Navigate to [[Events|< Events]] | <b>[[I-Star Student User Guide]]</b> | [[Youth in Care Tab|Youth in Care Tab >]])</small></center> | |||
Latest revision as of 10:25, 9 September 2022
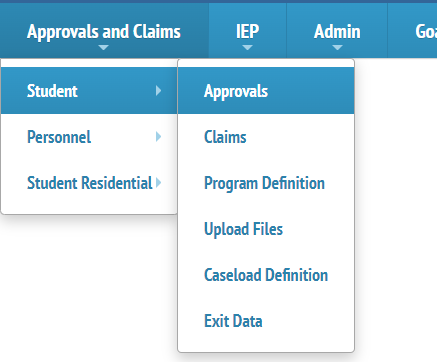
Step 1: Click the Approvals and Claims tab and select Student & Approvals.

Step 2: Click the Student Profile icon.

Step 3: Click the Transportation button to enter to the student's special transportation information.

Step 4: Click Add next to the section you where wish to add a new record.

Transportation Schedule
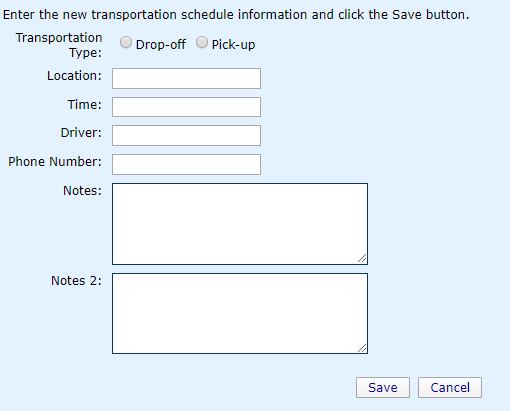
Step 5: Enter the appropriate information and click Save.

Step 4: To edit a transportation schedule record, simply click the pencil icon. To delete, click the red X.

Special Needs
Step 6: Choose the special need from the drop-down and click Save.
NOTE: Special Needs in this drop-down are populated from the Special Needs Definition that required an initial set up. Click here for instructions to add a Special Needs Definition.

Step 7: To edit a special needs record, simply click the pencil icon. To delete, click the red X.

Billing History
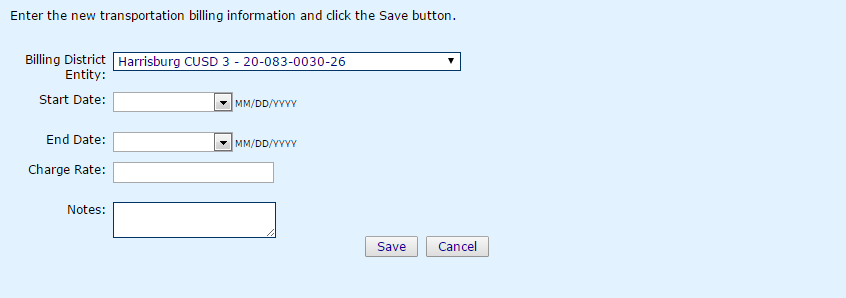
Step 8: Enter the appropriate information and click Save.

Step 9: To edit a billing history record, simply click the pencil icon. To delete, click the red X.

Step 10: Click Return to go back to the student's profile.

Step 11: Click Back To Student Approvals to go back to the Student Approval Search page.
