Adding Student Approval Record: Difference between revisions
new screenshot |
mNo edit summary |
||
| (2 intermediate revisions by the same user not shown) | |||
| Line 6: | Line 6: | ||
NOTE: The student must have an SIS ID to be entered into I-Star. To obtain a student SIS ID, you will need to contact your SIS Admin. | NOTE: The student must have an SIS ID to be entered into I-Star. To obtain a student SIS ID, you will need to contact your SIS Admin. | ||
[[File:Adding Student Approval.png|alt=Adding Student Approval|none|thumb|980x980px]] | [[File:Adding Student Approval.png|alt=Adding Student Approval|none|thumb|980x980px]] | ||
Search for students by using multiple criteria: ''Last Name, First Name, DOB'' and ''Gender'' or search by ''SIS ID''. You can add criteria from the ''Advanced'' section to refine your results. Once your criteria is entered, click '''Search.''' | Search for students by using multiple criteria: ''Last Name, First Name, DOB'' and ''Gender'' or search by ''SIS ID''. You can add criteria from the ''Advanced'' section to refine your results. Once your criteria is entered, click '''Search.''' | ||
[[File:Adding Student Approval 1.png|alt=Adding Student Approval 1|none|thumb|951x951px]] | [[File:Adding Student Approval 1.png|alt=Adding Student Approval 1|none|thumb|951x951px]] | ||
To add the student, click the check-mark under the ''Select'' column or click on the student's name. | To '''add''' the student, click the ''check-mark'' under the ''Select'' column or click on the student's name. | ||
[[File:Adding Student Approval 2.png|alt=Adding Student Approval 2|none|thumb|958x958px]] | [[File:Adding Student Approval 2.png|alt=Adding Student Approval 2|none|thumb|958x958px]] | ||
Once you have selected the student, you will be able to enter the approval record for the desired student. | Once you have '''selected''' the student, you will be able to '''enter the approval record''' for the desired student. | ||
[[File:Enterstuappr.png|none|thumb|550x550px]] | |||
NOTE: If you click the '''Display SIS Enrollment''' button, this will show you the enrollment information that is provided in SIS. This will help you correct errors between SIS and I-Star. | NOTE: If you click the '''Display SIS Enrollment''' button, this will show you the enrollment information that is provided in SIS. This will help you correct errors between SIS and I-Star. [[File:Adding Student Approval 4.png|alt=Adding Student Approval 4|none|thumb|550x550px]] | ||
[[File:Adding Student Approval 4.png|alt=Adding Student Approval 4|none|thumb|550x550px]] | |||
After clicking the '''Display SIS Enrollment''' button, you view the SIS enrollment information. If you choose to minimize the SIS enrollment information, click '''Hide SIS Enrollment'''. | After clicking the '''Display SIS Enrollment''' button, you view the SIS enrollment information. If you choose to minimize the SIS enrollment information, click '''Hide SIS Enrollment'''. | ||
[[File:Adding Student Approval 5.png|alt=Adding Student Approval 5|none|thumb|582x582px]] | [[File:Adding Student Approval 5.png|alt=Adding Student Approval 5|none|thumb|582x582px]] | ||
Check for errors on this particular record by clicking the '''Save & Check Errors''' button at the bottom of the approval record. | Check for errors on this particular record by clicking the '''Save & Check Errors''' button at the bottom of the approval record. | ||
[[File:Adding Student Approval 6.png|alt=Save & Check Errors|none|thumb|167x167px]]When the approval record is completed, select the '''Add Approval''' radio button and then click '''Add'''. | [[File:Adding Student Approval 6.png|alt=Save & Check Errors|none|thumb|167x167px]] | ||
When the approval record is completed, select the '''Add Approval''' radio button and then click '''Add'''. | |||
[[File:Adding Student Approval 7.png|alt=Adding Student Approval 7.png|none|thumb|955x955px]] | [[File:Adding Student Approval 7.png|alt=Adding Student Approval 7.png|none|thumb|955x955px]] | ||
Once you exit the record, you will be taken back to the ''Student Approvals Filter Reported'' tab. | Once you exit the record, you will be taken back to the ''Student Approvals Filter Reported'' tab. | ||
[[File: | [[File:Mainpage.png|none|thumb|1537x1537px]] | ||
<center><small>(Navigate to [[Searching for Students|< Searching for Students]] | <b>[[I-Star Student User Guide]]</b> | [[Editing Student Approval Record|Editing Student Approval Record >]])</small></center> | <center><small>(Navigate to [[Searching for Students|< Searching for Students]] | <b>[[I-Star Student User Guide]]</b> | [[Editing Student Approval Record|Editing Student Approval Record >]])</small></center> | ||
Latest revision as of 14:05, 31 August 2022
To add a Student Approval record, click Add under the filters box.
NOTE: The student must have an SIS ID to be entered into I-Star. To obtain a student SIS ID, you will need to contact your SIS Admin.

Search for students by using multiple criteria: Last Name, First Name, DOB and Gender or search by SIS ID. You can add criteria from the Advanced section to refine your results. Once your criteria is entered, click Search.

To add the student, click the check-mark under the Select column or click on the student's name.

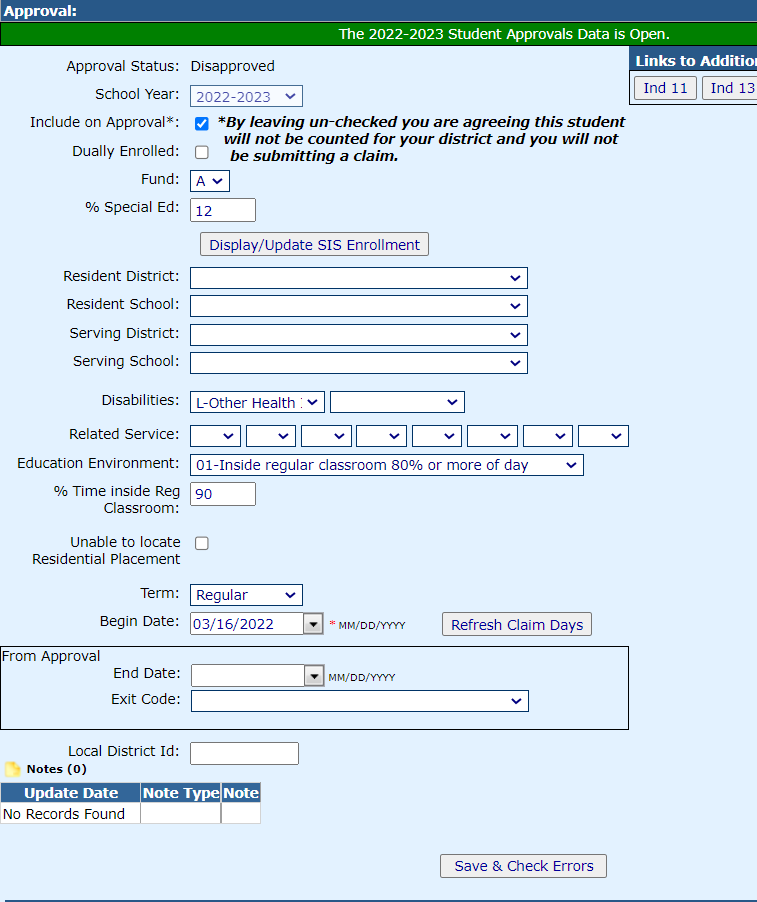
Once you have selected the student, you will be able to enter the approval record for the desired student.

NOTE: If you click the Display SIS Enrollment button, this will show you the enrollment information that is provided in SIS. This will help you correct errors between SIS and I-Star.

After clicking the Display SIS Enrollment button, you view the SIS enrollment information. If you choose to minimize the SIS enrollment information, click Hide SIS Enrollment.

Check for errors on this particular record by clicking the Save & Check Errors button at the bottom of the approval record.

When the approval record is completed, select the Add Approval radio button and then click Add.

Once you exit the record, you will be taken back to the Student Approvals Filter Reported tab.
